Getting the design process started for your new website or redesign of your current website can seem crazy and overwhelming. At Lara J Designs we like to do everything in our power to make the process simple and smooth. Below is a break down on how the website design & development process will go and how we can help make it easy.
Step 1: Initial Consultation
This initial meeting is for us to discuss the needs for your new website and get a good break down on how you want your new website to function. We can bounce ideas off one another while answering any questions you may have regarding your new website design and functionality. This meeting can take place at our office or over the phone, either way works for us! Just reach out to us through our quote request form, email or a phone call to set up the meeting. After scheduling, we will send you a questionnaire to help us gather information for our initial meeting.
Step 2: Quote your new Website
After the initial meeting, we will send you a quote for the website discussed. We offer both basic HTML websites and WordPress websites. A WordPress website has a content management system where you will have access to edit the content, update photos in galleries, post blog articles, etc.
Once you receive the quote and we answer any questions you may have, we will need an emailed acceptance on the quote of your choosing and a 50% deposit before getting started on any design work. Then we move forward with the fun part!
Two things you should have before getting started: domain and hosting.
Your domain is your url for your website (example: our domain name is larajdesigns.com). You can purchase multiple domains and we can point them all in the same direction of your site, but you really only need one good domain that is easy to remember, spell and says what your company is/does. We recommend NameCheap.com to purchase your domain name.
Your Hosting account is less important to have up front, but will be needed to go live with your beautiful new website. Website Hosting is the service providing space on the Internet for website files. You must have website hosting to make your website available to the public on the internet. We recommend using Bluehost (general purpose sites) or WP Engine (WordPress sites). They both have great 24/7 customer service, which is incredibly important in case of anything that may go wrong with your website or email! Let us know if you would like our help setting your account up. We are happy to do that for you. If you would like to read more about domains & hosting, please visit this page.
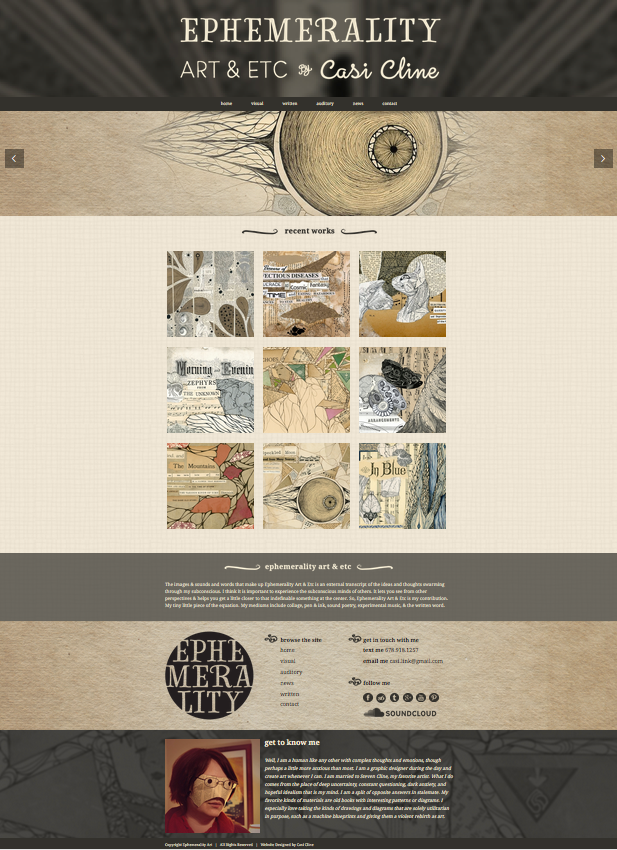
Step 3: Home Page Mockup Design
The first stage of the design process is to design an image of how your home page will look. For this step, we will need your desired home page text and images/graphics we may use. In this stage of the process we want you to focus on the design and layout. It is much easier to make changes to the website design in the mockup phase rather than after the entire site has been coded.
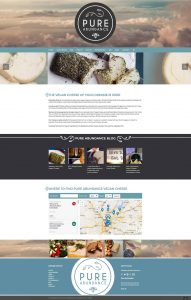
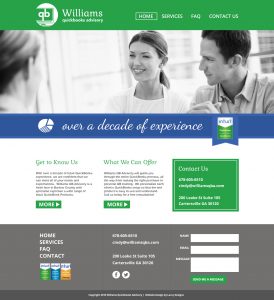
We will provide an image that will look like this:

While we work on the mockup of your website, we need you to focus on all content for the other pages. Gather all the images you would like used and write up your content in a Word Document or email. It is a good idea to have multiple people read it over and get feedback. Be sure to think about SEO keywords while you are writing your text. What words will people search to hopefully find your site? Make your list and do your best to use insert those words in your copy.
Stage 4: Coding the Development Website
This stage we code your website on our development server. We will need all your content for this stage. Once we are done coding, you will be able to click through your website to make sure you like the flow and that everything is setup how you would like. When we send you the link you can click through all pages on the site and test functionality.
After we make any revisions you need, we move forward to stage 5.
Stage 5: Website Live!
To go live, we need the final payment for the website and your hosting account log-in and domain account log-in. We will then transfer your website to your domain name, and you are all set!
If you decide to go with a WordPress website, we will schedule a 1 hour training session with you to walk you through step-by-step how to use your new content management system.